The medieval city of Norwich was defended on its north, west and south sides by a high, flint wall and a deep outer ditch.
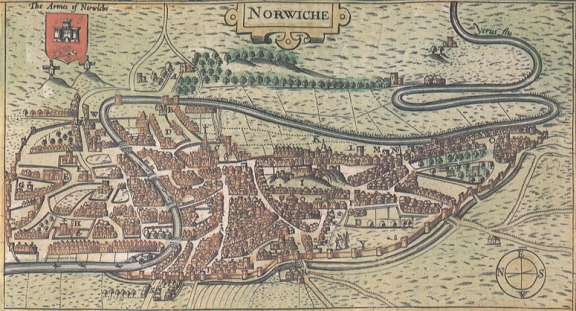
[1]On the east side of the city, although there was no wall because this side was protected by the river, the Bishop's Bridge was defended by a gatehouse. There were towers at regular intervals along the wall, linked by a wall walk, and there were eleven substantial gateways built across each of the main streets leading into the city. Brick and stone were used for strengthening the angles of the flint walls and for features such as doorways, arrow loops and crenellations.
[2]Documentary evidence, particularly the right to levy Murage Taxes to finance the construction work, indicates that construction of the flint wall in its present form and on its present line was begun about 1294 and was completed by the middle of the 14th century.

The earlier Anglo-Saxon settlement and the larger town that developed around the Castle, built after the Norman Conquest in the 11th century, were defended by ditches, banks and a palisade and there were certainly gates in these defences at strategic points. Parts of these defences were incorporated into the later work although the area enclosed by the 13th-century walls was much more extensive.
Some private property was appropriated and cleared of buildings when the wall was constructed. There was a lane on the outside of the ditch and a route around the inside of the wall, marked on 16th and 17th-century maps as the way under the wall, was kept clear of buildings. [3]These lanes, the line of the ditch and all the streets running out to and through the gates can still be seen in the street plan of modern Norwich.
As early as 1351 there were disputes over who was responsible for repairing the walls and how this work was to be financed. However, the defences of the city were generally maintained and occasionally modified or improved up until the late 18th century.
The substantial walls, towers and gates were constructed primarily for defence when war with France and direct attacks by the French army were a real threat. Southampton was attacked and extensively damaged by the French in 1338. Obviously the citizens, as individuals, would have felt threatened but perhaps what was more significant was that all trade in Southampton ceased or was severely disrupted for over a year while the city was repaired. This must have sharpened the resolve of the citizens of Norwich to complete and reinforce their own walls and gates.
The walls provided general security for the citizens and the defences were clearly seen as a tangible symbol of the power, pride and justice of the city. The gates were used for the display of the heads and quarters of miscreants executed at the city gallows. The walls also provided a useful control over the movement of goods in and out of the city which could then be effectively taxed. The gateways were shut at night and because of the wall and ditch, all goods had to be carried through the gates. Goods also arrived by river but here again the control of trade may have been one function of the defences. The wharves and quays in the centre of the town could only be reached through the Boom Towers [4]and one function of the Cow Tower is said to have been the control of customs.
As well as defence, the gates were also used for civic functions and reflected civic pride. The gates were decorated with coats of arms and records survive for improvements made to the gateways or extra decoration applied to them when the monarch or dignitaries arrived in great state. These people travelled with vast processions of carts, horses and men. Accounts of the visit to Norwich by Elizabeth I in August 1558 describe the Queen being met by the mayor and Council at the city boundary where she was welcomed and presented with the sword of the city. At St Stephen's gate which had been especially decorated her arrival was heralded by the City Waits and just inside the gate a stage had been set up for a presentation by children of the city. It is interesting that a false gateway had been constructed to form an appropriate entry to the market place.
By the 1790s, the pressure on traders was rather different and, despite an impending war, again with France, there was pressure by merchants and the council to open up the city to encourage trade. Most of the gateways were demolished in 1793 and 1794. [5-8] Ber Street gate was dismantled in 1807 and the last gate to survive, that at Magdalen Street, was removed in 1808.
The outer ditch of the city walls had been poorly maintained and had been gradually silting up or filling with rubbish for at least two centuries. During the 19th century the surviving ditch was filled in and buildings gradually encroached on either side of the wall. Some sections of the wall collapsed or were plundered for building materials. In the middle of the last century, parts of the wall were demolished for redevelopment and road widening.
[9] Despite these losses, fifteen substantial sections of the wall survive above ground including Cow Tower and the towers at Bull Close Road, and St Stephen's, the two towers on Carrow Hill and the Boom Towers on either side of the river at the south end of the defences.
Summary of Project: aims and methods
The planning and conservation department of the City Council in Norwich commissioned Purcell Miller Tritton and Historic Building Surveys Ltd to complete a detailed survey of the medieval walls of the city. The final report covers both the standing sections of the wall with their surviving towers and, where possible, includes material on the lost sections of the wall and the lost gates.
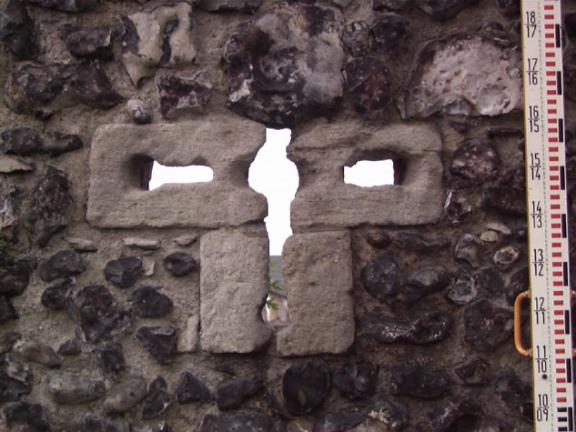
The primary task of the project was to produce accurate measured survey drawings to record in detail what survives and to locate these sections of the wall accurately against modern features of the urban landscape. [10] This survey was analytical and all surviving features are drawn and located precisely in 3D space by being logged on the main survey. These features include brick arches, arrow loops in cut stone, putlog holes from the original scaffolding and brick quoins. It was not feasible to draw every flint but where the arrangement of the flints or the coursing reflect important changes in date or phase then small representative areas of flint were recorded.
The survey data was taken using a Leica total-station theodolite with prism-less laser distance measuring. The survey plans and the elevation details were logged on site over a copy of the Ordnance Survey digital map of the city using survey software by Nigel Fradgley. The survey was tied in to the nearest Ordnance Survey bench marks to provide accurate height and grid references. The final survey drawings were produced on a CAD system and, as a consequence, line weight, typography and plot scale on the primary survey drawings can be adapted to generate drawings to serve a variety of uses from large scale working drawings for repair briefs to finely detailed illustrations for publication.
A detailed photographic record has been completed although modern buildings near the walls and, in some areas, heavy undergrowth restricted the scope of some of the coverage. Photographs are digitally stored and include scale references and precise cross-references to the survey drawings.
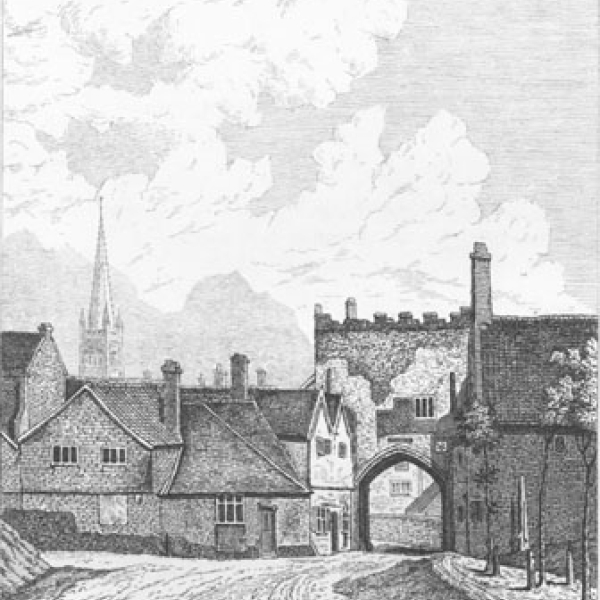
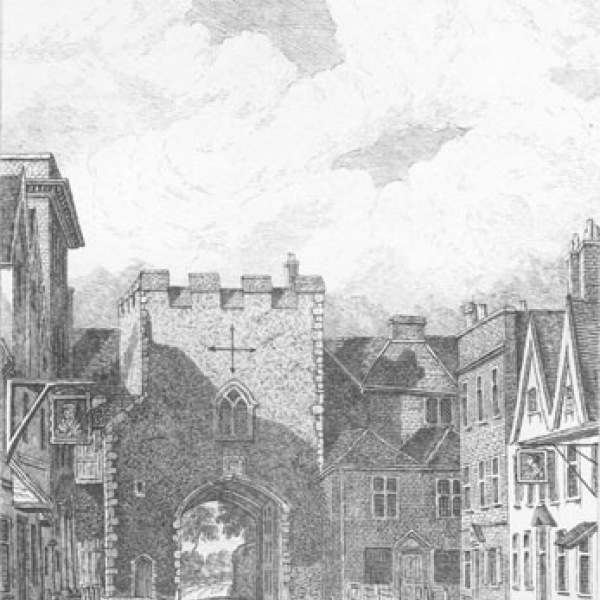
![[6] View of the site of St Giles' Gate in 2001, from the east, from inside the city. Note the three-storey house of three bays on the right that is shown on the view by Ninham.](/sites/default/files/styles/square_medium/public/2025-12/20_Gen01.jpg?itok=rdKvLjcM)
The final report includes an assessment of the condition of the surviving fabric and a description of the landscape setting. These should help the City Council to implement a coherent programme of repair, maintenance and conservation and determine priorities for that work. Where new developments will impinge or encroach on the site of the walls and towers these surveys should form the initial stage for archaeological impact assessments.
This project has also provided an opportunity to draw together historic material and collate recent reports and drawings from archaeological excavations.
The material has been presented both as printed reports of a more traditional format and as a 'dynamic' database. That is, the reports, drawings and illustrations are stored in a computer web format and with browser software the user can move through or around all the material on a computer screen using carefully arranged hyperlinks, standard forward and back commands and an appropriate word/find index. The database has been designed for a number of different users including the planning department, the Central Library Local History Collection and the Castle Museum archive. It is possible for users to print text, illustrations and A4 versions of the drawings directly from the database.
General conclusions:
Some general observations can be made about the character of the surviving wall.
Only at Ber Street, to the east of the site of the gate, does the wall survive to its full height including the parapet wall of the wall walk with merlons and crenellations. [11] From this section it is possible to get some sense of the scale of the wall, here almost 7 metres high, though even here what has been lost is the effect of seeing the wall rise up from the far side of a wide and deep ditch. The walls must originally have presented an impressive if not ominous view from inside the city as well as out, looming over all domestic buildings and dominating the view along all the streets that led up to the gates.
The wall was at least 1.9 metres thick though it is not always possible to determine the full width from the standing sections where extensive areas of facing flint were lost when buildings added against the wall were demolished. The full thickness of the wall has only been revealed when sections have been excavated. The wall through Jarrold's factory at River Lane is thin and completely rebuilt above ground. Excavations by the County Archaeologist revealed that because the outer ditch here was particularly wide and deep where it joined the river, the original wall, surviving below the present ground level, was very substantial.
The wide wall allowed for a wall walk at the top protected by a thinner parapet on the outer side. Where this parapet survives at Carrow Hill it rises about 2 metres above the walk, providing full cover for men keeping watch or defending the city from the wall top.